The new Git File History feature is extremely useful to quickly inspect changes to a file over time. You may find yourself in a situation where a file in your Git repository has been changed drastically since you worked on it. Or you may have forgotten what you changed previously and—most importantly—why you made those changes. Good commit messages go a long way in understanding the reasons behind past changes.
Most folks are working on code in an IDE like Xcode or VSCode. Those apps also manage the entire project and its files, not just editing. The question is how to quickly get a nice-looking File History like the one in Kaleidoscope 4.1 while working in one of those apps. This post offers a few convenient ways.
Xcode, VSCode, Nova, JetBrains IDEs, …
IDEs typically offer some kind of sidebar hosting all files in a project. In most of them, you can simply drag a file from that sidebar. This means you can drag it onto the Kaleidoscope icon or to Kaleidoscope Prism.
Dragging from the Sidebar
- In Xcode, the sidebar is called Project Navigator and can be shown via View > Navigators > Project, or by pressing ⌘1
- In Visual Studio Code (VSCode), it is called Explorer and can be shown via View > Explorer, or shortcut ⇧⌘E
- Panic’s Nova calls it Files Sidebar; get to it via View > Sidebars > Show Files Sidebar (Nova does not have a default keyboard shortcut, but you can set a custom one via Settings > Key Bindings)
- JetBrains IDEs call it Project; find it via View > Tool Windows > Project, also via keyboard shortcut ⌘1
Here’s an example of how to show the Git File History from VSCode:
Dragging from the Editor
Some apps like VSCode and Nova also allow you to drag the tab title above the editor. Xcode doesn’t do that, but it allows dragging of the file icon in the Path View. See below for an example showing this in Xcode. Note that this only works on the document icon, not the file name. Clicking the file name will immediately open a popup menu. This example uses Kaleidoscope Prism, which provides added convenience.
PyCharm and other JetBrains IDEs
Some products allow you to create custom menu commands for so-called External Tools. This applies to JetBrains IDEs such as IntelliJ IDEA, WebStorm, PhpStorm, Android Studio, and others.
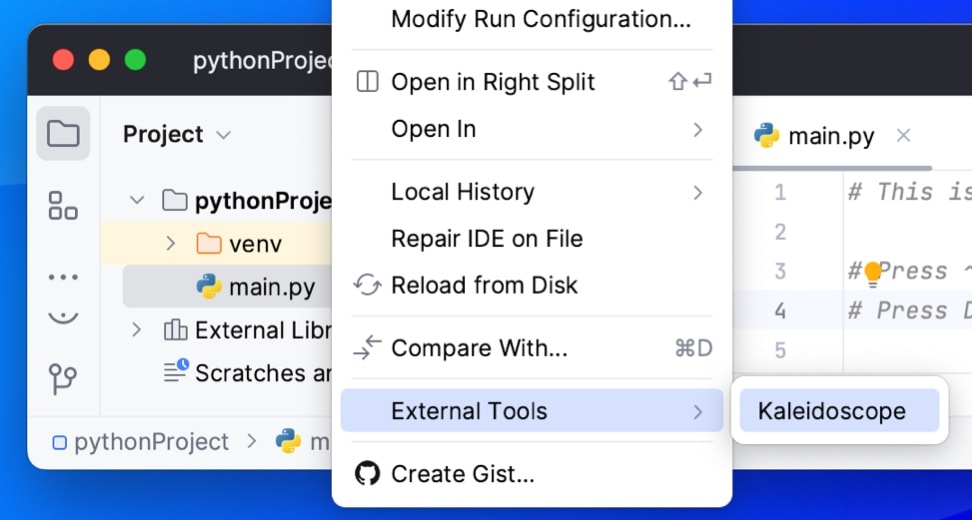
The example below demonstrates how to set up Kaleidoscope in PyCharm. Get started via PyCharm > Settings…, then find the group Tools in the list of settings, open it, and then select External Tools. On the right side, click the add (+) button and fill out as shown in the screenshot below.
Once set up, you can bring up the context menu on a file in the Project (sidebar) and select External Tools > Kaleidoscope.


Your favorite tool?
Did we miss your favorite IDE or other tool? Let us know and we’ll amend this blog post, so everyone can learn.

